
Monterey Park Wood Flooring installs herringbone wood floor patterns in Monterey Park, CA, drawing on more than 20 years of hardwood work to handle the layout, subfloor preparation and fine cutting that make or break the look. We lay herringbone and chevron in solid and engineered oak, from narrow classic slats to wider modern ones, and in single rooms, entries and whole open-plan floors.
A herringbone floor is unforgiving. A layout line that is off by a small amount at the doorway becomes an obvious drift by the far wall, and a subfloor with a dip telegraphs through every joint. That is why we dry-lay the pattern and center it on the room before the first slat is fastened, and why we check the subfloor for flatness and stiffness before quoting.
You receive a drawing of the proposed layout showing where the centerline runs, how the pattern meets each doorway, and whether it will be framed with a border. The quote separates materials, subfloor work and pattern labor.
Herringbone and Chevron Patterns
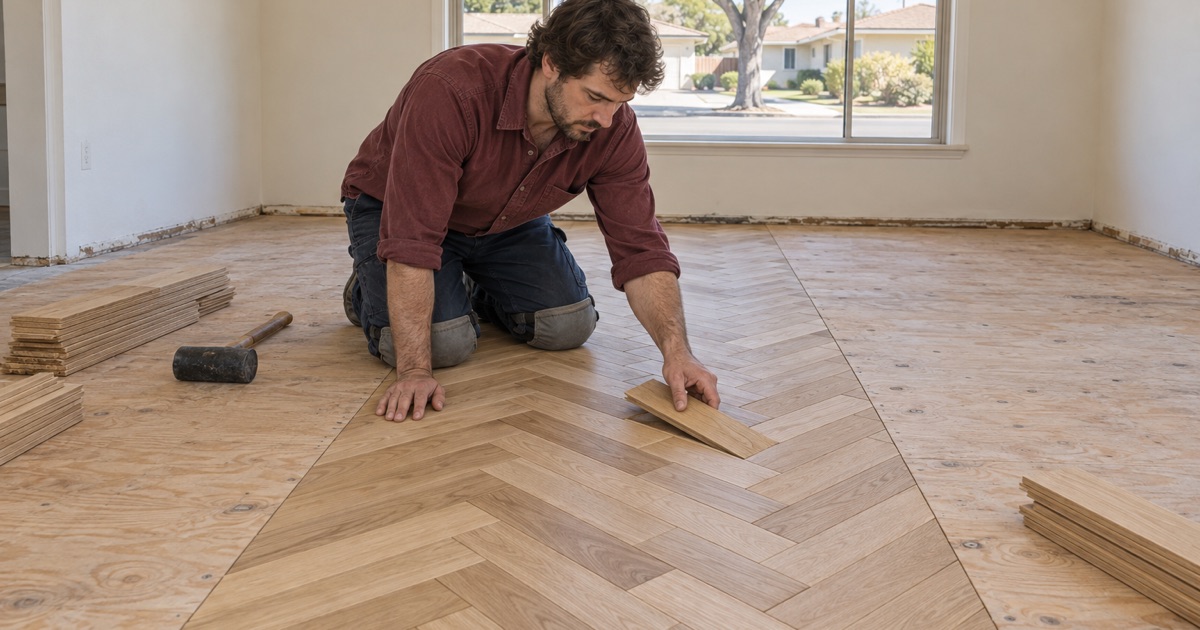
Classic Herringbone Layouts
Classic herringbone sets rectangular slats at right angles, the end of each slat butting against the side of its neighbor to form a staggered zigzag. It suits both traditional and modern rooms and can be laid in single or double herringbone, where two slats run side by side in each row for a bolder rhythm.
Slat size changes the character of the floor. Shorter, narrower slats give a finer, busier pattern that suits smaller rooms, while longer, wider slats look calmer across a large living space. We lay out sample runs on the floor so you can judge the scale before committing.
Chevron Floors
Chevron slats are cut with angled ends so the points meet cleanly in a continuous V. The pattern reads as more directional than herringbone, pulling the eye down a hallway or across a long room, which makes the layout centerline even more important.
Because the angled cuts must meet exactly, chevron is usually supplied as precision-milled engineered slats. We check the fit of each batch, reject any slats that are out of tolerance, and plan the layout so the points align with the room’s main axis.
Subfloor Preparation for Herringbone
Flatness and Stiffness
A pattern floor has far more joints per square foot than a straight lay, so any dip, hump or flex in the subfloor shows up as uneven edges and lippage. We check the subfloor with a long straightedge and fix high and low spots before layout begins.
On a raised foundation we look at joist spacing and deflection from the crawl space and stiffen the floor with blocking or an added plywood layer where needed. A bouncy floor can open joints in a herringbone pattern within a season.
Slabs and Moisture
Over a concrete slab-on-grade, engineered herringbone is usually glued directly down. We test the slab’s moisture before committing, level it with a compatible compound, and choose an adhesive rated for the slab’s conditions so the slats stay bonded.
Where solid herringbone is wanted over a slab, a plywood layer is usually installed first. That raises the floor height, so we plan transitions and door clearances before installation begins.
Materials for a Herringbone Floor
Solid or Engineered Slats
Solid herringbone slats can be sanded many times over the life of the floor and suit nail-down installation over a plywood subfloor. Engineered slats are more stable across changes in humidity and are the usual choice over a slab or radiant heat. We measure the wear layer on any engineered product before recommending it for a floor you may want to refinish later.
Both types need acclimation. Slats are delivered and left in the house while we read their moisture content against the subfloor’s, because a pattern floor has so many joints that small amounts of shrinkage after installation show up as gaps at every slat end rather than along a few long seams.
White Oak, Red Oak and Finish Choices
White oak is the most common herringbone species, taking natural, gray and darker stains evenly and showing off rift sawn and quartersawn grain. Red oak gives a warmer look at a lower cost. We finish with waterborne polyurethane, oil-modified polyurethane or hardwax oil, all chosen from products legal in the South Coast air district.
Stain behaves differently on a pattern floor, because the grain changes direction from slat to slat and catches the light at two angles. A color that looks even on a straight-laid sample can look striped once it is in herringbone, so we test stain on sanded slats laid in the pattern, in the room’s own light, before finishing the whole floor.
Borders, Transitions and Details
Borders and Framing
Many herringbone floors are framed with a border of straight boards along the walls, which gives the pattern a clean edge and hides the angled cuts. We recommend a border in rooms with irregular walls or where the pattern needs to stop at a fireplace or cabinetry.
Borders can be one board wide or several, in the same species or a contrasting one, and they can run around the whole room or only across a doorway. We draw the border into the layout plan with the centerline, so the pattern ends on a full or evenly cut slat on both sides rather than a sliver along one wall.
Meeting Other Floors and Stairs
Where the pattern meets another room, we use a flush reducer, T-molding or a threshold board, and we plan how it will meet stair nosing at the top of a staircase. Getting those details right keeps the pattern looking deliberate at every edge, not just in the center of the room.
We also leave the expansion gap the flooring maker specifies along every wall and hide it under baseboard or quarter round. A herringbone floor fitted tight to the walls has nowhere to go when humidity rises, and the pattern can lift or buckle along its joints.
- 20+ Years on Wood Floors
- Itemized Written Quotes
- Lead-Safe Checks on Pre-1978 Homes